A No-Nonsense Guide for Small Business Owners
If you woke up to an automated email from Google warning you about “Possible unresolved security risks” in your Google Workspace account, take a breath—your domain hasn’t been breached.
This guide breaks down what Google’s Security Advisor email actually means, how to navigate the security advisor dashboard, and the exact steps to turn those alarmist red icons into blue information marks or green ticks.
What Google Security Advisor Alerts Actually Mean
Google sends a monthly email summary to Super Administrators covering five core areas:
- email security,
- data protection,
- access from unsafe devices,
- account security, and
- 2-Step Verification (2SV).
Receiving an alert doesn’t mean an attacker is currently inside your systems; it simply means Google detected an unaddressed setting or potential risk over the last 30 days.
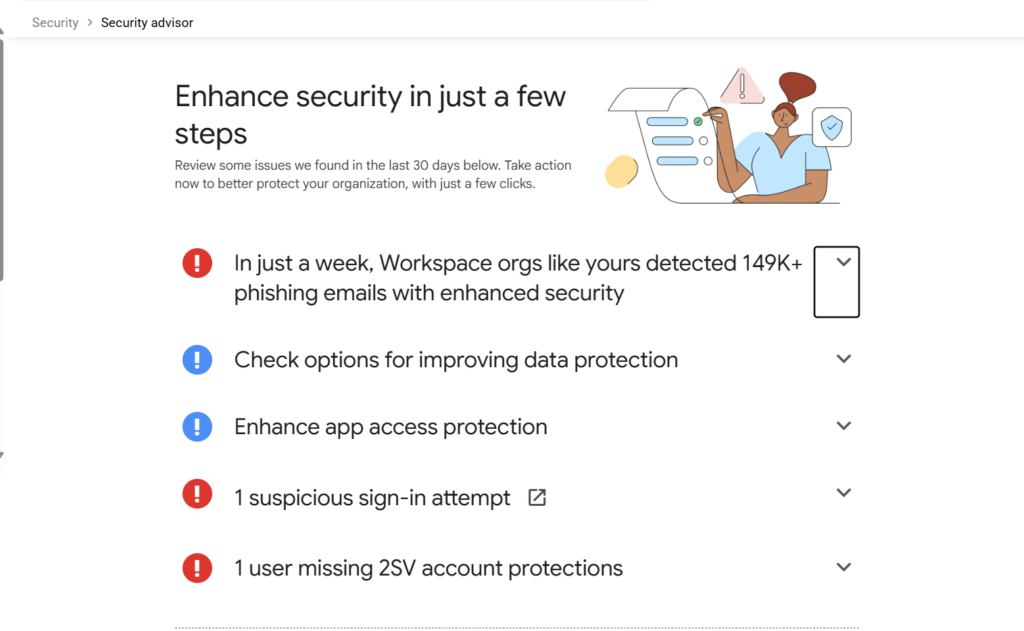
When you log into your Security Advisor dashboard, you’ll see three main indicators:
- Red Exclamation Mark: Urgent. Action or an audit is required.
- Blue Exclamation Mark: Recommendation or security tip (often Google highlighting features available on higher subscription tiers).
- Green Tick: Fully protected and compliant.
Step-by-Step Security Advisor Review
Step 1 – Access the Security Advisor Dashboard
- Log into admin.google.com
- From the left hand side menu go to Security > Security Advisor
Step 2 – Undertake the “Set-and-Forget” Fixes
These three areas take less than two minutes to update and generally remain green once enabled.
1. Phishing and Web Security. From the dashboard, click on the downward arrow and then enable the recommended security settings.
A new tab will open for Gmail malware and phishing protection. Check the box for Enhanced malware and phishing protection, click Save, and refresh your main tab.
2. Account Security. From the dashboard, click on the downard arrow and then enable the ‘enforce strong passwords and enable passkey sign-ins’ option.
3. 2-Step Verification (2SV). Enforce 2SV across your domain and ensure all team members have completed their enrollment.
If you’re not sure how to do this then check out my video on How to enforce 2-Step Verification: The Right Way (2026)
Step 3: Manage Ongoing Security Alerts
The remaining two panels require periodic checks or an understanding of your plan limits:
1. Data Protection: Tracks whether team members share sensitive company files externally. On Business Starter and Standard plans, these insights are read-only. You do not need to upgrade to Business Plus unless you require automated Data Loss Prevention (DLP) rules.
2. Access from Unsafe Devices: A blue mark here is informative only, and is simply Google highlighting you could get more protection by upgrading your subscription.
However, if you see a red exclamation mark, you need to run an audit:
- Click the outward-facing arrow on the panel to open Reporting > Audit and investigation.
- Select Device log events and clear the default date filter.
- Add the following filters using OR logic:
- Has potentially harmful apps is True
- OS is outdated is True
- Security patch is outdated is True
- Click Search to pinpoint which device (or devices) triggered the flag.
Note: Google Workspace frequently flags false positives for Windows 11 PCs due to how Microsoft labels its OS version builds.
Cross-reference the OS build number in your audit results against Microsoft’s official Windows release page before chasing an employee to update their laptop.

Hi, I’m Priya! I’m a certified Google Workspace Administrator and Product Expert who speaks ‘human’, not I.T.
I help small business owners stop wrestling with their Google Workspace and start using it to grow.
Leave a Reply