Yes, I know I’m making a big claim – to have written the best way to set up your Google Workspace free 14 day trial, but this post is based on seeing the same issues coming up over and over in the Google Workspace Admin forums.
So to hopefully stop you from experiencing these problems I’ve put together this article on the best way to set up your 14 day Google Workspace trial!
Step 1: Get ready
Get a pen and paper. Yes, I know we’re about to start our digital journey with Google Workspace but believe me, you’re going to want to have these analogue tools handy!
The second part of Getting Ready is ensuring you already have a domain that you wish to use with Google Workspace. Having this ready to go will make the sign up process just that little bit easier – trust me on this! So, if you don’t already have a domain name please head over to your favourite domain registrar to grab one.
And finally, get in touch to see how I can help you get 10% savings on your first year with Google Workspace.
Step 2: Start the sign up process
Ok, now we’re going to get into the sign up process. Note, this post is up to date as of 8 February 2023, and that although I try to keep my information up to date, Google does change it’s sign up processes fairly regularly. So some of these screenshots may not be precisely accurate. If that’s the case, please do leave a comment letting me know I need to update the screenshots!
Step 2A.
Open an incognito or private browser window in your browser of choice on your computer. (Chrome is recommended and it’s what I’ll be assuming you are using from now on).
Step 2B.
Go to workspace.google.com and click on Start Free Trial

Step 2C.
Fill in your business name, select the number of employees in your business and confirm that your region is correct. Then click on Next.
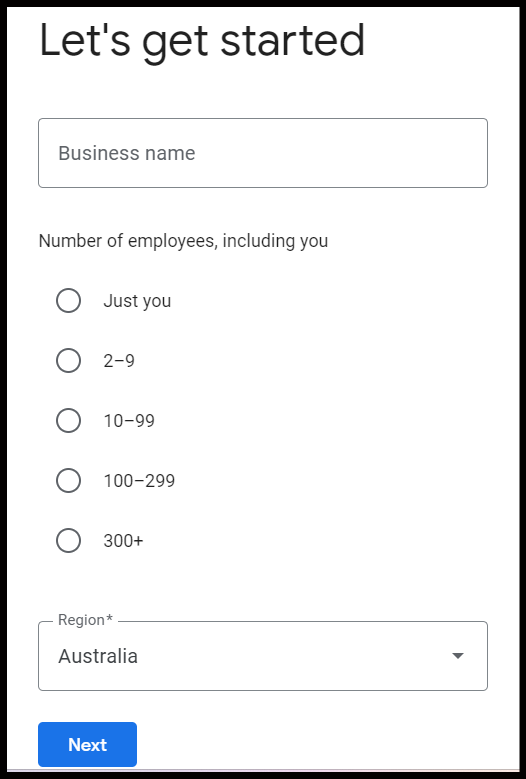
By the way, you can only have up to 10 users in a Google Workspace free trial so even if you have more users in your business, (and you select the relevant number of employees radio button) you won’t be able to add them until after the trial is ended.
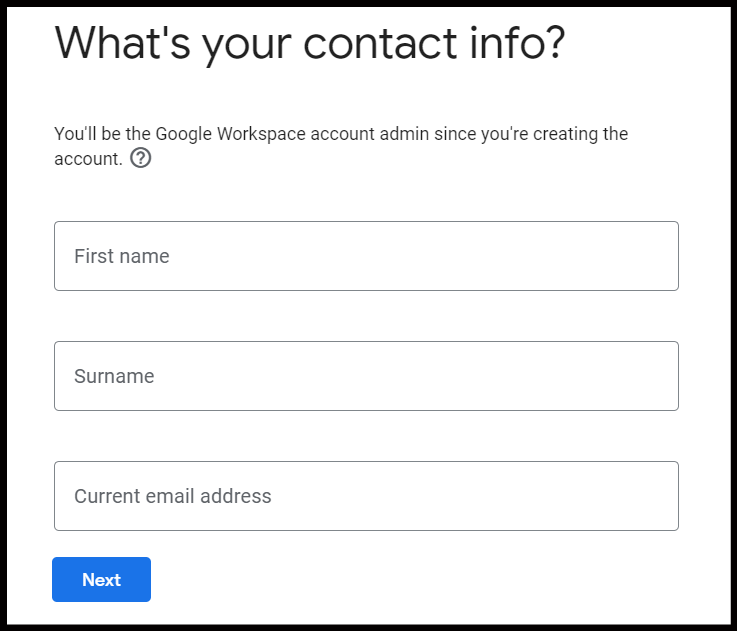
Step 2D.
Now enter your First name and Surname. STOP – do not enter your email address until you’ve read the two pro tips below.
Pro tip: Make sure your current email address is one that you know you will always have access to – this is going to be your recovery email address so it’s important you get this right.
Get out your pen and paper and write down “Current email address for Google Workspace is _____________” (putting the email address in lieu of the blank space of course 🙂 ).
Now enter your Current email address and click on Next.
Step 2E.
Click on Yes, I have one that I can use. If you don’t have a domain already, please go back and read Step one! Or alternatively, open a new browser tab, purchase your new domain from your domain registrar of choice and then come back to your Google Workspace set up tab and click on Yes.
If you select No, Google takes you through a purchasing flow that ultimately ends up with you purchasing a domain through Google domains. If you’re happy with that, then do select No, but personally I prefer to use alternative domain registrars.

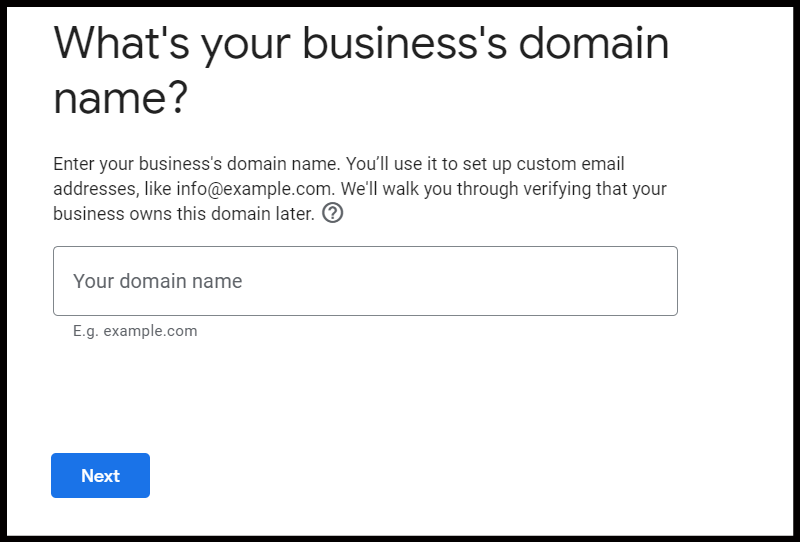
Step 2F.
Enter your domain name – you don’t need to put in the www portion, just put in the main domain details like: example.com.
Click on Next and in the next window click on Next again.
Step 2G.
The next two screens ask if you’d like you and your users / employees to be kept up to date with “helpful tips, special offers and feature announcements”. I recommend clicking on Ok for both offers. It’s easy enough to unsubscribe down the path, but I’ve found it’s also handy for you and your users / employees to get these updates.
Step 3: creating an administrator username and password
I’ve pulled this out as a standalone step because it is definitely one of THE sticking points for people down the track. Get this wrong and you will find yourself in a world of hurt.
Firstly, you need to be aware that whatever username you put here, it will (at least initially) be the login for your super-administrator account and it will also be your own email address in Google Workspace. So pick something that is easy to use and that you don’t mind sharing with other people as an email address.
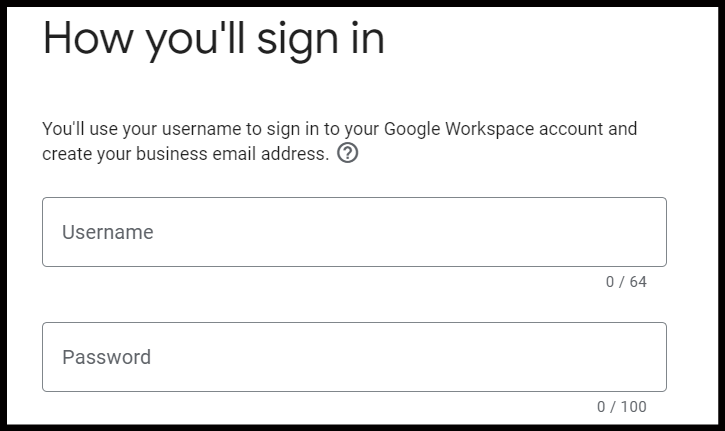
Pro tip: DO NOT use admin@ – this automatically tells hackers that this is a desirable email address to hack into, and is definitely not recommended by any cyber security person ever.
So, enter your username and then enter a password. If you’re using Google Chrome then you’ll probably have the opportunity to choose an automatically generated password or you can enter a passphrase instead (my own personal choice).
Pro tip: It doesn’t matter what you decide but MAKE SURE you note the full username (e.g. priya@example.com) AND your password/passphrase in a secure place (NOT the piece of paper!!). If you lose this information it will be very difficult and time-consuming to regain access to your Google Workspace setup.
Now click in the I’m not a robot checkbox and on Agree and continue.
Step 4: Complete the set up process
Nice work! You’re almost finished with setting up your Google Workspace free 14 day trial the right way!
Click on Continue to setup in the next screen and then on I understand.
The Google Workspace Admin Console wizard tool will now take you through how to
- verify that you actually own the domain name you’ve used here;
- activate Gmail (this is an optional step by the way, you don’t need to do this during the free trial); and
- add more users (again this is optional, and remember you can only have 10 users [including yourself] in the free trial).
To recap (TL;DR)
Here’s the 4 things you must do to prevent issues down the track
Number 1: Keep a record of your recovery email. This is the email address you added in Step 2D in the ‘Current email address’ field and it must be an email address that you have regular access to.
If someone else is setting this trial up on your behalf then make sure you give them an email address that they can put in this field.
Number 2: When creating a username (Step 3) make sure it is something that you are happy to use as an email address (this_is_my_username@example.com isn’t a good option!).
Again, if someone is setting this trial up for you, make sure you give them your preferred username beforehand.
Number 3: Create a strong password/passphrase.
Number 4: Record your username and password/passphrase somewhere secure like a password manager.
Number 5: (You don’t have to do this to prevent issues, but it can save you money!) Get in touch to see how I can help you get 10% savings on your first year with Google Workspace.
Looking for help with a specific issue?
I can help with a number of common Google Workspace issues, such as regaining administrator access; fixing email delivery issues; and cybersecurity.
Leave a Reply