Sharing passwords to access generic inboxes like info@yourbusiness.com.au is a fast track to security risks and locked accounts.
If you run a small business with a team of up to five people, there is a far better way to handle incoming enquiries.
In this guide, I break down your options for managing shared inboxes in Google Workspace and walk you step-by-step through setting up delegated access – including three non-negotiable settings to stop email mix-ups for good.
Choosing the Right Shared Inbox Approach
If you are a sole trader, stick to Alternative or Alias Emails. They are completely free, and you can set up to 30 of them.
However, if you have at least one other person reading and responding to customer emails, you have three main choices:
- Google Groups (Collaborative Inbox): Included free in your Workspace subscription and keeps email history in one place. The catch? The interface is clunky, terrible on mobile, and if someone replies from their personal address, the thread breaks.
- Third-Party Apps (Hiver, Help Scout): Excellent features like internal notes and response tracking, but monthly costs stack up quickly because you pay per user.
- Delegated Access Account (Recommended): Paying for one extra Google Workspace license (info@) and delegating access gives your team a clean, familiar Gmail inbox on desktop and mobile without sharing passwords.
Note: Delegated access only works for users on your domain.
Step-by-Step: Setting Up Delegated Access
Step 1: Enable Delegation in the Admin Console
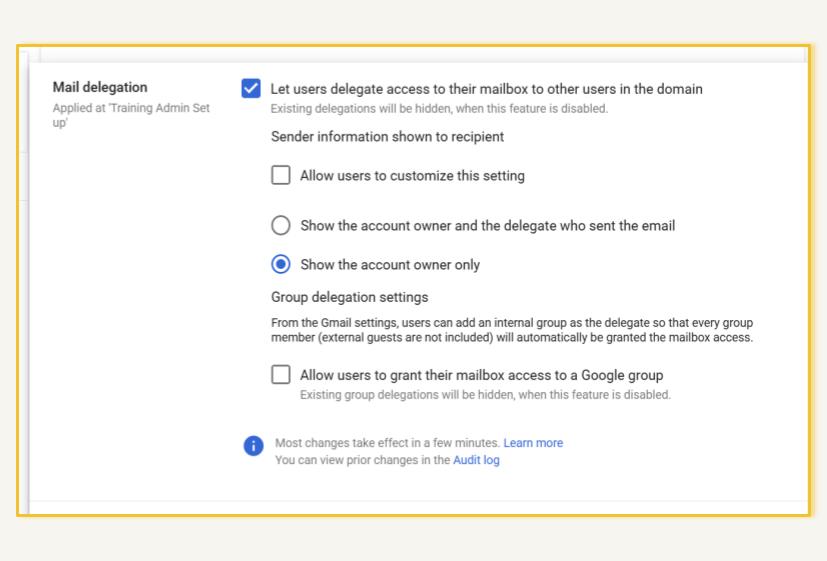
- Log into admin.google.com and go to Apps > Google Workspace > Gmail > User settings > Mail delegation.
- Check the box to “Let users delegate access to their mailbox to other users in the domain”.
- Must-Get-Right Setting #1: Deselect “allow users to customise this setting” and select “Show the account owner only”. This ensures outgoing emails always display as info@yourbusiness.com.aurather than individual team names.
- Click Save.
Step 2: Create the Dedicated Account
- Go to Directory > Users > Add new user and create your info@ account.
- Copy the temporary password and open an Incognito Browser Window.
- Log into Gmail as the newly created account.
Step 3: Grant Access and Configure Key Settings
- Go to Settings (gear icon) > See all settings > Accounts.
- Under “Grant access to your account”, enter the email addresses of the team members who need access.
- Must-Get-Right Setting #2: Select “Mark conversation as read”. When one person opens an email, it instantly updates for the entire team to prevent double-handling.
- Switch to the General tab, scroll to Signature, and set up your default signature. Check the “Insert signature before quoted text” box and save.
- Must-Get-Right Setting #3: Select the Labels tab and click “Create new label” to make a label for each team member (e.g. Assigned: Sarah) so emails can be assigned appropriately.
Step 4: Team Actions
- Your team members will receive an email invitation (valid for 7 days).
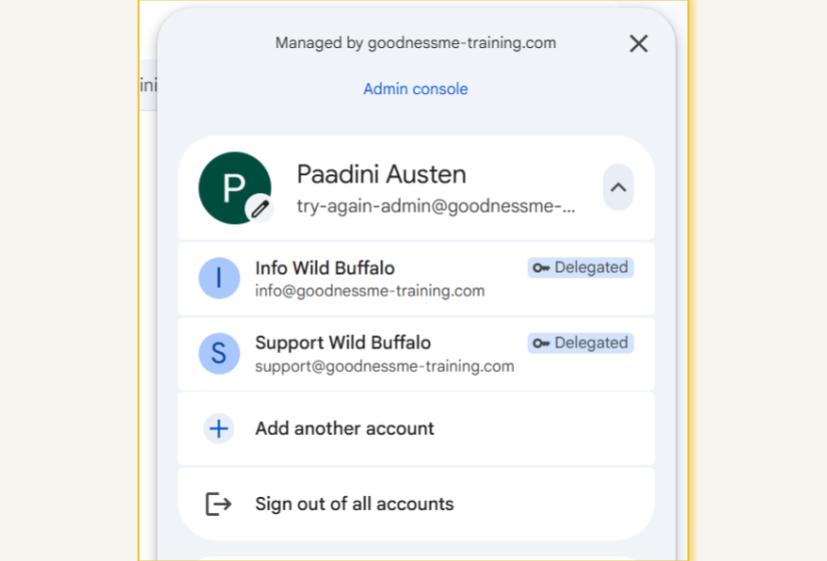
- Once accepted, they simply click their profile picture in Gmail and select the delegated inbox. It opens in a fresh tab with no passwords required.
- Now, they can just access that account’s inbox whenever they want to read or reply to those emails.
Note: Google is gradually rolling out a “Set up a shared inbox” feature directly on the Users card in the Admin Console. If visible on your dashboard, use it to automatically attach team members without sending email invites.

Hi, I’m Priya! I’m a certified Google Workspace Administrator and Product Expert who speaks ‘human’, not I.T.
I help small business owners stop wrestling with their Google Workspace and start using it to grow.
Leave a Reply