
When you sign up to Google Workspace, you are automatically assigned the ‘Super Admin’ role. That means you have access to all features in the Admin console and can manage every aspect of your organisation’s account.
Super administrators also have full access to all users’ calendars and event details.
Which is great right? After all, you’re the owner of this small business and you might even be the sole employee (hello to all the sole traders and solopreneurs out there!); so you should definitely have all the rights and privileges that the Super Admin role gives you.
Except.
Google itself, in its Security best practices for administrator accounts states that a super admin account should not be used for daily activities and that staying signed in to a super admin account when you aren’t doing specific administrative tasks can increase exposure to phishing attacks.
So, each super administrator should also have a separate ‘regular user’ account that they use for day-to-day activities. For example, if Deepti is a super admin, she should have one identifiable admin account and one user account:
- Super Admin account: admin-deepti@example.com,
- User account: deepti@example.com
Deepti should then sign in to her super admin account as needed to do specific tasks and then sign out on completion.
But it’s pretty difficult to NOT be signed in as a Super Admin if you only have the one login to Google Workspace – i.e the one that was created when you initially signed up for Google Workspace!
So what should you do to improve the security of your Google Workspace setup?
Well you should definitely create a separate user account to be the super-admin rather than continuing to use your regular user account! To do that though there’s four steps you need to undertake:
- Sign up to Google Cloud identity Free
- Create a new user
- Add recovery information for this new user
- Transfer the Super Admin role to that user and remove it from your current account.
By the way although there’s only four steps the process can be quite long when written out in full. If you prefer, you can access a PDF of this process from this link.
But why do I need to sign up to Google Cloud Identity? (And what is it??)
Let’s start with the second question first.
What is Google Cloud identity?
Cloud Identity is an Identity as a Service – basically it is a separate user who can have certain roles and accesses within Google Workspace but is not perhaps a physical employee. For our purposes we’ll be creating a Google Cloud Identity Free user which brings us back to the first question…
Why do I need to create a Google Cloud Identity Free user?
Ok, the reason for doing this is to essentially save money! Each user you add to Google Workspace is an additional licence cost, and when you’re the only employee it just doesn’t make sense to pay for an additional user – when that ‘user’ is actually just you signing in under a different guise!
Even as a small business owner with more than one employee, if you can save money on user licenses why not?
Bear in mind that a Google Cloud Identity Free user is free precisely because they don’t have access to all services, such as Gmail, Google Calendar, and Google Sites. However, they can still access Google Drive, Docs, Sheets, Slides, Keep, Meet and act as an Administrator (which is exactly what we want).
Right, so let’s get on with creating this pseudo-user!
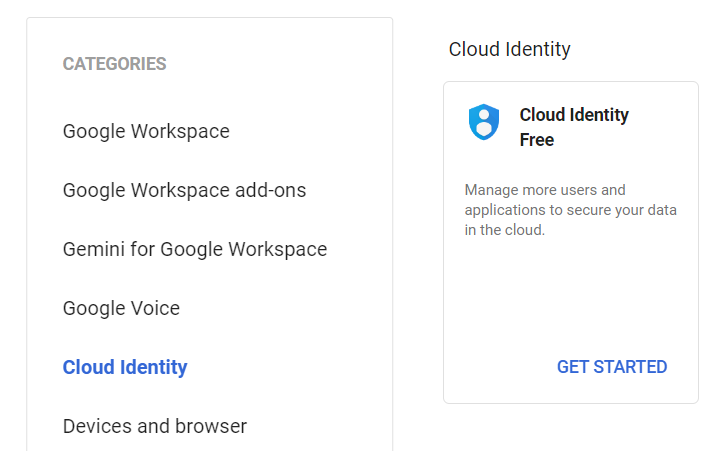
First step: Sign up to Google Cloud Identity
- Go to https://admin.google.com/ac/billing/catalog
- Click on Cloud Identity in the left hand side menu
- Then click on Get Started under Cloud Identity Free
- Click on Next
- Click on Checkout.
- Click on Place Order
You’ll now see confirmation of your ‘purchase’ and some interesting wording regarding reviewing your auto-licensing settings.
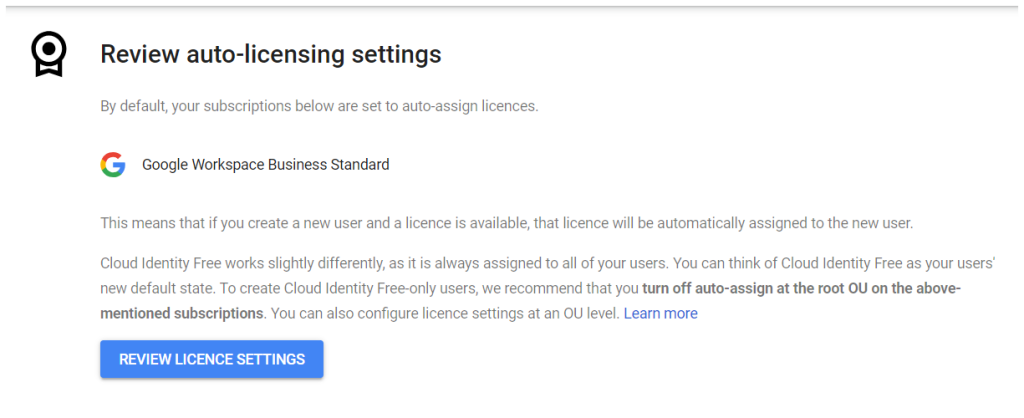
What does that mean?
Essentially what this is saying is that after you sign up for Cloud Identity, all new users you add to your organisation automatically become free Cloud Identity users as well as having a paid Google Workspace license.
Since the whole reason for doing this is to have a free user, let’s go ahead and click on Review Licence Settings. You’ll see the following screen:

- Hover to the right of Automatic Licensing until you see the pencil icon and then click on it.
- Click on the drop down arrow and then click on OFF.
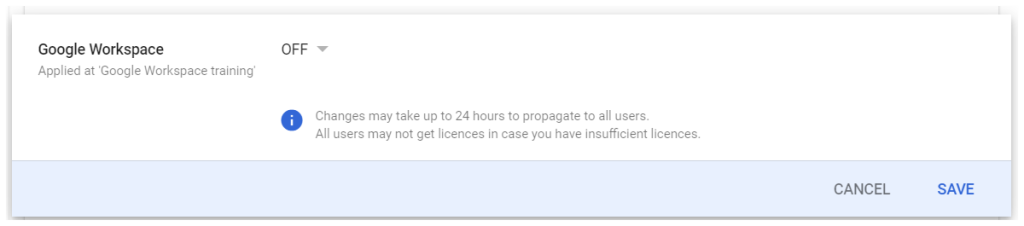
- Click on Save.
Now it’s time to add your pseudo-user!
Second step: Create the Pseudo-User
- Click on the Left Hand Side hamburger menu
- Hover over Directory and click on Users (or copy and paste this link to go directly to the Users screen: https://admin.google.com/ac/users)
- Click on Add new user and fill in the details. Given this is a pseudo-user you might need to be creative about the first and last name as well as the email address.
- Click on Add new user.
- From the ‘New User added’ pop-up that now appears click on Copy Password. You’re going to need this to log in as the new user! (You might want to paste it in a Google Keep note for the time being as there’s one last step to go before you can log in as the new user).
- Once you’ve pasted the password somewhere safe, click on Done in the bottom left.
- Click the Refresh arrow in the browser toolbar and you’ll see the new user added in your user list.
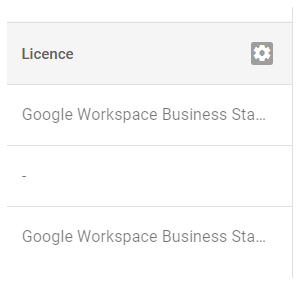
If you want to confirm that you’ve given them a Free license rather than a paid Workspace licence
- Click on the gear icon in the top right of the table.
- Then next to Add new column click on the drop down arrow and select Licence.
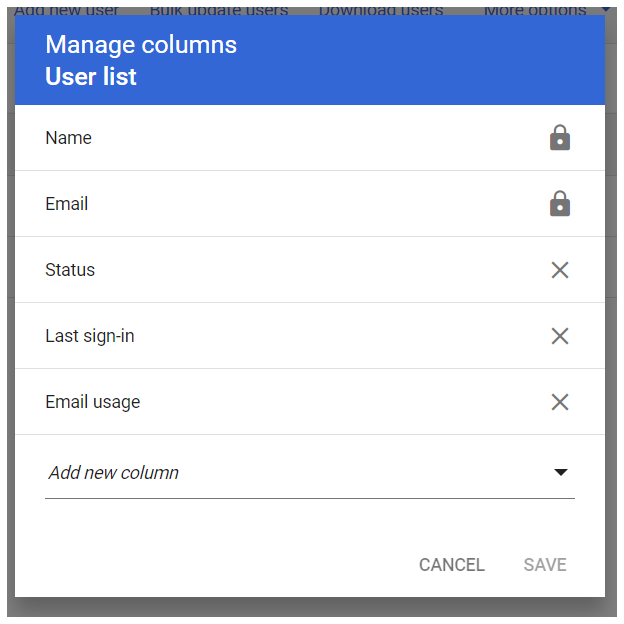
- Click on Save.
You’ll see an additional column in the table now showing which users have a paid Google Workspace license and which ones do not.
Third step: Set up recovery information
THIS STEP IS MANDATORY. DO NOT SKIP THIS STEP.
If you do not assign recovery information to your new user, and you lose access to the account for some reason, then you’ll lose access to your entire Google Workspace setup!
- Click on your pseudo-user.
- Click on the Security tab
- Scroll down the page and click on Add a recovery email.
- Type in an email address that you’ll have access to, even if you cannot log into Google Workspace.
- Enter a phone number that you will have regular and ongoing access to.
- Click on Save.
Fourth (and final!) step: Assign the super-admin role to the pseudo-user and remove it from your personal user account
- Scroll back up the page and click on the User details tab.
- Scroll down the page and click on Assign Roles
- Next to the Super Admin role, click the slider so it’s marked Assigned.

- Click Save.
Now you’re going to remove the role from your own personal account
- Open a New incognito window in your browser.
- Sign into admin.google.com as the pseudo-user. You may need to change your password at this time.
- Click on Account / Admin roles /Super Admin
- Then click the Down arrow next to Admins assigned
- Hover next to your personal user name and click on Unassign Role
- You’ll see a warning that the user will lose access to privileges immediately.
- Click on Unassign Role again.
And that’s it! You’ve finished creating a new (free!) Super administrator account
Phew, that was a lot of steps to achieve “the number one thing you must do after setting up Google Workspace in your small business” but it was definitely worth it.
Now, you’ll be able to use the pseudo-user account to undertake all your super admin tasks, whilst using your personal account for day-to-day activities.
I highly recommend setting a recurring reminder on your Google Calendar to log into your super admin account once a week, even if you don’t have any tasks to complete, in order to access any administrative emails that Google might send you, including billing notices.
If you want these steps as a handy PDF file by the way, just go to this link.
Want more personalised help?
I hope this article was of assistance to you, but if you want more personalised help then why not get in touch?
I specialise in helping small business owners just like you work better with Google Workspace so you can save time and money by streamlining your business processes; increasing your productivity; and improving client and employee comunications.